Go语言在2016年当选tiobe index的年度编程语言。
转眼间6个月过去了,Go在tiobe index排行榜上继续强势攀升,在最新公布的TIBOE INDEX 7月份的排行榜上,Go挺进Top10:

还有不到一个月,Go 1.9版本也要正式Release了(计划8月份发布),当前Go 1.9的最新版本是go1.9beta2,本篇的实验环境也是基于该版本的,估计与final go 1.9版本不会有太大差异了。在今年的GopherChina大会上,我曾提到:Go已经演进到1.9,接下来是Go 1.10还是Go 2? 现在答案已经揭晓:Go 1.10。估计Go core team认为Go 1还有很多待改善和优化的地方,或者说Go2的大改时机依旧未到。Go team的tech lead Russ Cox将在今年的GopherCon大会上做一个题为”The Future of Go”的主题演讲,期待从Russ的口中能够得到一些关于Go未来的信息。
言归正传,我们还是来看看Go 1.9究竟有哪些值得我们关注的变化,虽然我个人觉得Go1.9的变动的幅度并不是很大^0^。
一、Type aliasGo 1.9依然属于Go1系,因此继续遵守Go1兼容性承诺。这一点在我的“值得关注的几个变化”系列文章中几乎每次都要提到。
不过Go 1.9在语言语法层面上新增了一个“颇具争议”的语法: Type Alias。关于type alias的proposal最初由Go语言之父之一的Robert Griesemer提出,并计划于Go 1.8加入Go语言。但由于Go 1.8的type alias实现过于匆忙,测试不够充分,在临近Go 1.8发布的时候发现了无法短时间解决的问题,因此Go team决定将type alias的实现从Go 1.8中回退。
Go 1.9 dev cycle伊始,type alias就重新被纳入。这次Russ Cox亲自撰写文章《Codebase Refactoring (with help from Go)》为type alias的加入做铺垫,并开启新的discussion对之前Go 1.8的general alias语法形式做进一步优化,最终1.9仅仅选择了type alias,而不需要像Go 1.8中general alias那样引入新的操作符(=>)。这样,结合Go已实现的interchangeable constant、function、variable,外加type alias,Go终于在语言层面实现了对“Gradual code repair(渐进式代码重构)”理念的初步支持。
注:由于type alias的加入,在做Go 1.9相关的代码试验之前,最好先升级一下你本地编辑器/IDE插件(比如:vim-go、vscode-go)以及各种tools的版本。
官方对type alias的定义非常简单:
An alias declaration binds an identifier to the given type.
我们怎么来理解新增的type alias和传统的type definition的区别呢?
type T1 T2 // 传统的type defintionvs.type T1 = T2 //新增的type alias
把握住一点:传统的type definition创造了一个“新类型”,而type alias并没有创造出“新类型”。如果我们有一个名为“孙悟空”的类型,那么我们可以写出如下有意思的代码:
type 超级赛亚人 孙悟空type 卡卡罗特 = 孙悟空
这时,我们拥有了两个类型:孙悟空和超级赛亚人。我们以孙悟空这个类型为蓝本定义一个超级赛亚人类型;而当我们用到卡卡罗特这个alias时,实际用的就是孙悟空这个类型,因为卡卡罗特就是孙悟空,孙悟空就是卡卡罗特。
我们用几个小例子再来仔细对比一下:
1、赋值Go强调“显式类型转换”,因此采用传统type definition定义的新类型在其变量被赋值时需对右侧变量进行显式转型,否则编译器就会报错。
//github.com/bigwhite/experiments/go19-examples/typealias/typedefinitions-assignment.gopackage main// type definitionstype MyInt inttype MyInt1 MyIntfunc main() { var i int = 5 var mi MyInt = 6 var mi1 MyInt1 = 7 mi = MyInt(i) // ok mi1 = MyInt1(i) // ok mi1 = MyInt1(mi) // ok mi = i //Error: cannot use i (type int) as type MyInt in assignment mi1 = i //Error: cannot use i (type int) as type MyInt1 in assignment mi1 = mi //Error: cannot use mi (type MyInt) as type MyInt1 in assignment}
而type alias并未创造新类型,只是源类型的“别名”,在类型信息上与源类型一致,因此可以直接赋值:
//github.com/bigwhite/experiments/go19-examples/typealias/typealias-assignment.gopackage mainimport 'fmt'// type aliastype MyInt = inttype MyInt1 = MyIntfunc main() { var i int = 5 var mi MyInt = 6 var mi1 MyInt1 = 7 mi = i // ok mi1 = i // ok mi1 = mi // ok fmt.Println(i, mi, mi1)} 2、类型方法
Go1中通过type definition定义的新类型,新类型不会“继承”源类型的method set:
// github.com/bigwhite/experiments/go19-examples/typealias/typedefinition-method.gopackage main// type definitionstype MyInt inttype MyInt1 MyIntfunc (i *MyInt) Increase(a int) { *i = *i + MyInt(a)}func main() { var mi MyInt = 6 var mi1 MyInt1 = 7 mi.Increase(5) mi1.Increase(5) // Error: mi1.Increase undefined (type MyInt1 has no field or method Increase)}
但是通过type alias方式得到的类型别名却拥有着源类型的method set(因为本就是一个类型),并且通过alias type定义的method也会反映到源类型当中:
// github.com/bigwhite/experiments/go19-examples/typealias/typealias-method1.gopackage maintype Foo struct{}type Bar = Foofunc (f *Foo) Method1() {}func (b *Bar) Method2() {}func main() { var b Bar b.Method1() // ok var f Foo f.Method2() // ok}
同样对于源类型为非本地类型的,我们也无法通过type alias为其增加新method:
//github.com/bigwhite/experiments/go19-examples/typealias/typealias-method.gopackage maintype MyInt = intfunc (i *MyInt) Increase(a int) { // Error: cannot define new methods on non-local type int *i = *i + MyInt(a)}func main() { var mi MyInt = 6 mi.Increase(5)} 3、类型embedding
有了上面关于类型方法的结果,其实我们也可以直接知道在类型embedding中type definition和type alias的差异。
// github.com/bigwhite/experiments/go19-examples/typealias/typedefinition-embedding.gopackage maintype Foo struct{}type Bar Footype SuperFoo struct { Bar}func (f *Foo) Method1() {}func main() { var s SuperFoo s.Method1() //Error: s.Method1 undefined (type SuperFoo has no field or method Method1)}
vs.
// github.com/bigwhite/experiments/go19-examples/typealias/typealias-embedding.gopackage maintype Foo struct{}type Bar = Footype SuperFoo struct { Bar}func (f *Foo) Method1() {}func main() { var s SuperFoo s.Method1() // ok}
通过type alias得到的alias Bar在被嵌入到其他类型中,其依然携带着源类型Foo的method set。
4、接口类型接口类型的identical的定义决定了无论采用哪种方法,下面的赋值都成立:
// github.com/bigwhite/experiments/go19-examples/typealias/typealias-interface.gopackage maintype MyInterface interface{ Foo()}type MyInterface1 MyInterfacetype MyInterface2 = MyInterfacetype MyInt intfunc (i *MyInt)Foo() {}func main() { var i MyInterface = new(MyInt) var i1 MyInterface1 = i // ok var i2 MyInterface2 = i1 // ok print(i, i1, i2)} 5、exported type alias
前面说过type alias和源类型几乎是一样的,type alias有一个特性:可以通过声明exported type alias将package内的unexported type导出:
//github.com/bigwhite/experiments/go19-examples/typealias/typealias-export.gopackage mainimport ( 'fmt' 'github.com/bigwhite/experiments/go19-examples/typealias/mylib')func main() { f := &mylib.Foo{5, 'Hello'} f.String() // ok fmt.Println(f.A, f.B) // ok // Error: f.anotherMethod undefined (cannot refer to unexported field // or method mylib.(*foo).anotherMethod) f.anotherMethod()}
而mylib包的代码如下:
package mylibimport 'fmt'type foo struct { A int B string}type Foo = foofunc (f *foo) String() { fmt.Println(f.A, f.B)}func (f *foo) anotherMethod() {} 二、Parallel Complication(并行编译)
Go 1.8版本的gc compiler的编译性能虽然照比Go 1.5刚自举时已经提升了一大截儿,但依然有提升的空间,虽然Go team没有再像Go 1.6时对改进compiler性能那么关注。
在Go 1.9中,在原先的支持包级别的并行编译的基础上又实现了包函数级别的并行编译,以更为充分地利用多核资源。默认情况下并行编译是enabled,可以通过GO19CONCURRENTCOMPILATION=0关闭。
在aliyun ECS一个4核的vm上,我们对比了一下并行编译和关闭并行的差别:
# time GO19CONCURRENTCOMPILATION=0 go1.9beta2 build -a stdreal 0m16.762suser 0m28.856ssys 0m4.960s# time go1.9beta2 build -a stdreal 0m13.335suser 0m29.272ssys 0m4.812s
可以看到开启并行编译后,gc的编译性能约提升20%(realtime)。
在我的Mac 两核pc上的对比结果如下:
$time GO19CONCURRENTCOMPILATION=0 go build -a stdreal 0m16.631suser 0m36.401ssys 0m8.607s$time go build -a stdreal 0m14.445suser 0m36.366ssys 0m7.601s
提升大约13%。
三、”./…”不再匹配vendor目录自从Go 1.5引入vendor机制以来,Go的包依赖问题有所改善,但在vendor机制的细节方面依然有很多提供的空间。
比如:我们在go test ./…时,我们期望仅执行我们自己代码的test,但Go 1.9之前的版本会匹配repo下的vendor目录,并将vendor目录下的所有包的test全部执行一遍,以下面的repo结构为例:
$tree vendor-matching/vendor-matching/├── foo.go├── foo_test.go└── vendor └── mylib ├── mylib.go └── mylib_test.go
如果我们使用go 1.8版本,则go test ./…输出如下:
$go test ./...ok github.com/bigwhite/experiments/go19-examples/vendor-matching 0.008sok github.com/bigwhite/experiments/go19-examples/vendor-matching/vendor/mylib 0.009s
我们看到,go test将vendor下的包的test一并执行了。关于这点,gophers们在go repo上提了很多issue,但go team最初并没有理会这个问题,只是告知用下面的解决方法:
$go test $(go list ./... | grep -v /vendor/)
不过在社区的强烈要求下,Go team终于妥协了,并承诺在Go 1.9中fix该issue。这样在Go 1.9中,你会看到如下结果:
$go test ./...ok github.com/bigwhite/experiments/go19-examples/vendor-matching 0.008s
这种不再匹配vendor目录的行为不仅仅局限于go test,而是适用于所有官方的go tools。
四、GC性能GC在Go 1.9中依旧继续优化和改善,大多数程序使用1.9编译后都能得到一定程度的性能提升。1.9 release note中尤其提到了大内存对象分配性能的显著提升。
在”go runtime metrics“搭建一文中曾经对比过几个版本的GC,从我的这个个例的图中来看,Go 1.9与Go 1.8在GC延迟方面的指标性能相差不大:
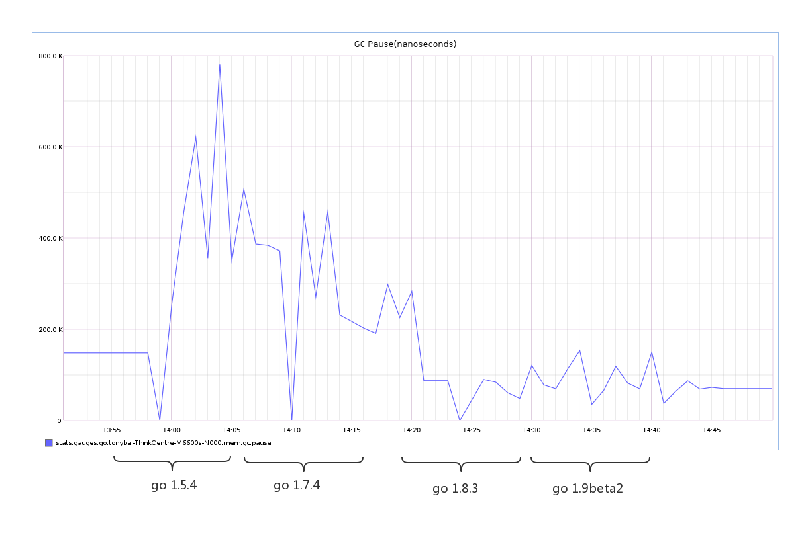
下面是Go 1.9的一些零零碎碎的改进,这里也挑我个人感兴趣的说说。
1、Go 1.9的新安装方式go 1.9的安装增加了一种新方式,至少beta版支持,即通过go get&download安装:
# go get golang.org/x/build/version/go1.9beta2# which go1.9beta2/root/.bin/go18/bin/go1.9beta2# go1.9beta2 versiongo1.9beta2: not downloaded. Run ’go1.9beta2 download’ to install to /root/sdk/go1.9beta2# go1.9beta2 downloadDownloaded 0.0% (15208 / 94833343 bytes) ...Downloaded 4.6% (4356956 / 94833343 bytes) ...Downloaded 34.7% (32897884 / 94833343 bytes) ...Downloaded 62.6% (59407196 / 94833343 bytes) ...Downloaded 84.6% (80182108 / 94833343 bytes) ...Downloaded 100.0% (94833343 / 94833343 bytes)Unpacking /root/sdk/go1.9beta2/go1.9beta2.linux-amd64.tar.gz ...Success. You may now run ’go1.9beta2’# go1.9beta2 versiongo version go1.9beta2 linux/amd64# go1.9beta2 env GOROOT/root/sdk/go1.9beta2
go1.9 env输出支持json格式:
# go1.9beta2 env -json{ 'CC': 'gcc', 'CGO_CFLAGS': '-g -O2', 'CGO_CPPFLAGS': '', 'CGO_CXXFLAGS': '-g -O2', 'CGO_ENABLED': '1', 'CGO_FFLAGS': '-g -O2', 'CGO_LDFLAGS': '-g -O2', 'CXX': 'g++', 'GCCGO': 'gccgo', 'GOARCH': 'amd64', 'GOBIN': '/root/.bin/go18/bin', 'GOEXE': '', 'GOGCCFLAGS': '-fPIC -m64 -pthread -fmessage-length=0 -fdebug-prefix-map=/tmp/go-build750457963=/tmp/go-build -gno-record-gcc-switches', 'GOHOSTARCH': 'amd64', 'GOHOSTOS': 'linux', 'GOOS': 'linux', 'GOPATH': '/root/go', 'GORACE': '', 'GOROOT': '/root/sdk/go1.9beta2', 'GOTOOLDIR': '/root/sdk/go1.9beta2/pkg/tool/linux_amd64', 'PKG_CONFIG': 'pkg-config'} 2、go doc支持查看struct field的doc了
我们使用Go 1.8查看net/http包中struct Response的某个字段Status:
# go doc net/http.Response.Statusdoc: no method Response.Status in package net/httpexit status 1
Go 1.8的go doc会报错! 我们再来看看Go 1.9:
# go1.9beta2 doc net/http.Response.Statusstruct Response { Status string // e.g. '200 OK'}# go1.9beta2 doc net/http.Request.Methodstruct Request { // Method specifies the HTTP method (GET, POST, PUT, etc.). // For client requests an empty string means GET. Method string} 3、核心库的变化
a) 增加monotonic clock支持
在2017年new year之夜,欧美知名CDN服务商Cloudflare的DNS出现大规模故障,导致欧美很多网站无法正常被访问。之后,Cloudflare工程师分析了问题原因,罪魁祸首就在于golang time.Now().Sub对时间的度量仅使用了wall clock,而没有使用monotonic clock,导致返回负值。而引发异常的事件则是新年夜际授时组织在全时间范围内添加的那个闰秒(leap second)。一般来说,wall clock仅用来告知时间,mnontonic clock才是用来度量时间流逝的。为了从根本上解决问题,Go 1.9在time包中实现了用monotonic clock来度量time流逝,这以后不会出现时间的“负流逝”问题了。这个改动不会影响到gopher对timer包的方法层面上的使用。
b) 增加math/bits包
在一些算法编程中,经常涉及到对bit位的操作。Go 1.9提供了高性能math/bits package应对这个问题。关于bits操作以及算法,可以看看经典著作《Hacker’s Delight》。这里就不举例了。
c) 提供了一个支持并发的Map类型
Go原生的map不是goroutine-safe的,尽管在之前的版本中陆续加入了对map并发的检测和提醒,但gopher一旦需要并发map时,还需要自行去实现。在Go 1.9中,标准库提供了一个支持并发的Map类型:sync.Map。sync.Map的用法比较简单,这里简单对比一下builtin map和sync.Map在并发环境下的性能:
我们自定义一个简陋的支持并发的类型:MyMap,来与sync.Map做对比:
// github.com/bigwhite/experiments/go19-examples/benchmark-for-map/map_benchmark.gopackage mapbenchimport 'sync'type MyMap struct { sync.Mutex m map[int]int}var myMap *MyMapvar syncMap *sync.Mapfunc init() { myMap = &MyMap{ m: make(map[int]int, 100), } syncMap = &sync.Map{}}func builtinMapStore(k, v int) { myMap.Lock() defer myMap.Unlock() myMap.m[k] = v}func builtinMapLookup(k int) int { myMap.Lock() defer myMap.Unlock() if v, ok := myMap.m[k]; !ok { return -1 } else { return v }}func builtinMapDelete(k int) { myMap.Lock() defer myMap.Unlock() if _, ok := myMap.m[k]; !ok { return } else { delete(myMap.m, k) }}func syncMapStore(k, v int) { syncMap.Store(k, v)}func syncMapLookup(k int) int { v, ok := syncMap.Load(k) if !ok { return -1 } return v.(int)}func syncMapDelete(k int) { syncMap.Delete(k)}
针对上面代码,我们写一些并发的benchmark test,用伪随机数作为key:
// github.com/bigwhite/experiments/go19-examples/benchmark-for-map/map_benchmark_test.gopackage mapbenchimport 'testing'func BenchmarkBuiltinMapStoreParalell(b *testing.B) { b.RunParallel(func(pb *testing.PB) { r := rand.New(rand.NewSource(time.Now().Unix())) for pb.Next() { // The loop body is executed b.N times total across all goroutines. k := r.Intn(100000000) builtinMapStore(k, k) } })}func BenchmarkSyncMapStoreParalell(b *testing.B) { b.RunParallel(func(pb *testing.PB) { r := rand.New(rand.NewSource(time.Now().Unix())) for pb.Next() { // The loop body is executed b.N times total across all goroutines. k := r.Intn(100000000) syncMapStore(k, k) } })}... ...
我们执行一下benchmark:
$go test -bench=.goos: darwingoarch: amd64pkg: github.com/bigwhite/experiments/go19-examples/benchmark-for-mapBenchmarkBuiltinMapStoreParalell-4 3000000 515 ns/opBenchmarkSyncMapStoreParalell-4 2000000 754 ns/opBenchmarkBuiltinMapLookupParalell-4 5000000 396 ns/opBenchmarkSyncMapLookupParalell-4 20000000 60.5 ns/opBenchmarkBuiltinMapDeleteParalell-4 5000000 392 ns/opBenchmarkSyncMapDeleteParalell-4 30000000 59.9 ns/opPASSok github.com/bigwhite/experiments/go19-examples/benchmark-for-map 20.550s
可以看出,除了store,lookup和delete两个操作,sync.Map都比我自定义的粗糙的MyMap要快好多倍,似乎sync.Map对read做了特殊的优化(粗略看了一下代码:在map read这块,sync.Map使用了无锁机制,这应该就是快的原因了)。
d) 支持profiler labels
通用的profiler有时并不能完全满足需求,我们时常需要沿着“业务相关”的执行路径去Profile。Go 1.9在runtime/pprof包、go tool pprof工具增加了对label的支持。Go team成员rakyll有一篇文章“Profiler labels in go”详细介绍了profiler labels的用法,可以参考,这里不赘述了。
六、后记正在写这篇文章之际,Russ Cox已经在GopherCon 2017大会上做了”The Future of Go”的演讲,并announce Go2大幕的开启,虽然只是号召全世界的gopher们一起help and plan go2的设计和开发。同时,该演讲的文字版已经在Go官网发布了,文章名为《Toward Go 2》,显然这又是Go语言演化史上的一个里程碑的时刻,值得每个gopher为之庆贺。不过Go2这枚靴子真正落地还需要一段时间,甚至很长时间。当下,我们还是要继续使用和改善Go1,就让我们从Go 1.9开始吧^0^。
本文涉及的demo代码可以在这里下载。
来自:Go 1.9中值得关注的几个变化